![Routes Car Rental Reviews Is Routes Car Rental a Good Choice [2022]](https://www.86autos.com/wp-content/uploads/2022/10/Routes-Car-Rental-Reviews-Is-Routes-Car-Rental-a-Good-Choice-2022.jpg)


Not many people are aware that the ceiling of their car is called a car headliner, let alone how to clean a car headliner. Even though you may be familiar with cleaning methods for car carpeting and upholstery, they cannot be applied to cleaning the ceiling.
We step in at this point. We’ll demonstrate how to properly clean the ceiling of your car. Unfortunately, you can’t simply use hot water and soap to scrub the car headliner clean. When you do this, you risk permanent harm and sagging.
In cars, the headliner is a soft, foam-like interior that is finished with fabric, suede, vinyl, or leather. The headliner may over time acquire stains or odors from normal use, such as dust or smoke. To maintain the car ceiling, these materials require extra care when cleaning.
Table of Contents
Required Tools and Materials
From a straightforward microfiber cloth to a large cleaning apparatus like a steam cleaner, cleaning supplies are required for a headliner. Find out what tools you would need below:
Microfiber Cloth
Whether you’re going to just gently rub a few spots or clean the entire surface of the car roof, you will be needing a microfiber cloth. This would be used to remove stains and loosen debris during spot cleaning. After gently scrubbing the entire headliner, this would be helpful for surface cleaning to remove extra moisture.
Soft-Bristled Brush
In all cleaning techniques for a headliner, a soft brush would be necessary. When deep cleaning, it would be used to scrub after steam cleaning, scrub the entire headliner, and remove loose debris from surfaces. Therefore, be sure to have a soft-bristled brush ready for any cleaning procedures you undertake.
Car Headliner Cleaner
The type of stain you have in your headliner will determine the type of cleaner you need. A general upholstery cleaner would be effective for removing water-based stains like soda and coffee. Or you may also make a DIY general cleaning solution using warm water, white vinegar, and liquid soap.
Alcohol and lacquer thinner can be used to remove oil-based stains like grease, ink, crayon, and makeup.
Spray Bottle
Both concentrated and ready-to-use cleaning solutions are available for automobiles. You will require a different spray bottle if the cleaner for your car’s upholstery is concentrated so that you can diluted it before using it.
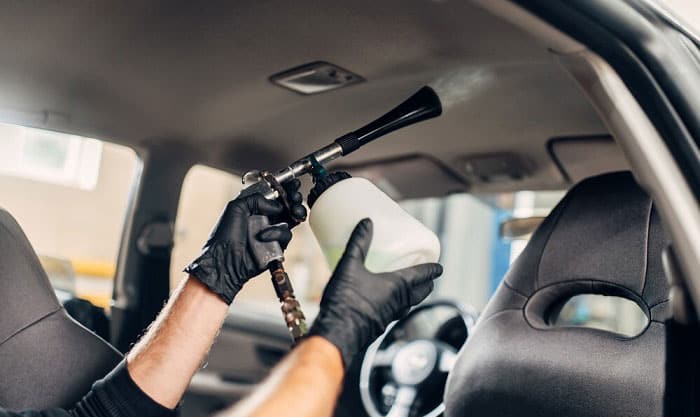
Steam Cleaner
You would require a steam cleaner if your headliner was exceptionally dirty and odorous. A steam cleaner’s hot steam produced by the cleaning solution it uses can remove stubborn stains and foul odors.
Vacuum Cleaner
You would also require a vacuum cleaner in addition to the steam cleaner and soft-bristled brush to gather some of the dirt you brushed out during deep cleaning.
Fans
After a deep clean, it’s crucial to completely dry the headliner because if it sits in water for too long, the glue holding it to cars may be destroyed, and mold and mildew may start to grow. After a thorough cleaning, a few fans would be useful for drying the headliner.
Step-by-Step Instructions
A headliner can be cleaned using one of three techniques. The best way to clean your car’s headliner depends on the condition of the material.
If your headliner isn’t too dirty and only has minor stains, you should use the first technique, the spot clean.
If the spot clean didn’t work or if your headliner had more stains and began to smell bad, the surface clean procedure would be needed.
Only when your headliner is extremely dirty and has an overwhelming amount of odor stuck to it should you use the third method, the deep clean.
Even though performing a deep clean is necessary when your headliner is exceptionally dirty and odorous, doing so incorrectly runs the risk of damaging it. The headliner’s glue could be melted by too much moisture or heat, causing the headliner to sag and develop mold and mildew. As a result, it ought to be used sparingly and as a last resort.
Simply adhere to a few easy steps to complete the necessary method for your headliner. You can find them below:
Spot Clean Your Headliner
Spot cleaning works best for headliners that only have one or two troublesome spots.
- Start by wiping the headliner down with a microfiber cloth or brushing off any loose debris that has become stuck there. Be careful not to smear the dirt particles into the headliner fabric.
- Next, use a microfiber cloth to remove the stain. Spray your upholstery cleaning solution on a small patch of the cloth, or just lightly mist the troublesome area. With the towel’s moistened portion, then, gently wipe the stain. You only need to spray the car ceiling cleaner on the headliner’s surface because you’re only cleaning the trouble spots. The cleaning agent or liquid doesn’t need to soak in.
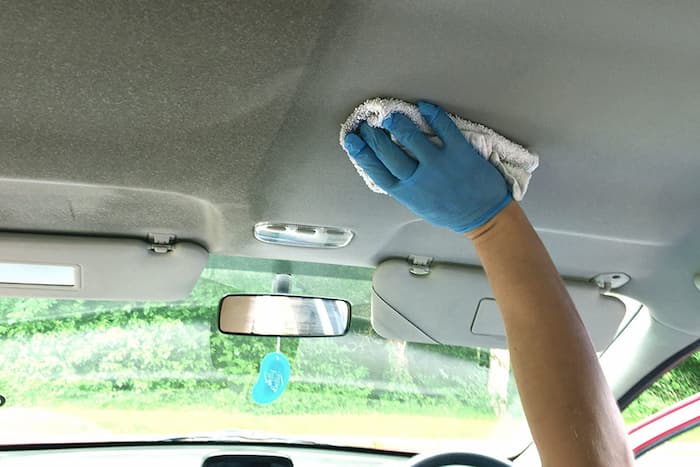
- Then, check to see if the stain is gone after letting it completely dry and wiping away any remaining moisture with a dry microfiber cloth.
Surface Clean Your Car Headliner
You should think about surface cleaning if the stains or dirt on your headliner are dispersed over a larger area.
- Take care not to soak the headliner as you evenly spray upholstery cleaner across the entire surface. The extremely grimy areas, corners, and crevices around the lights, overhead console, and sunroof should receive special attention.
- To get to work on the stains, let the cleaner sit for a while. You can reapply and go through the procedure if you’re not pleased with the outcome.
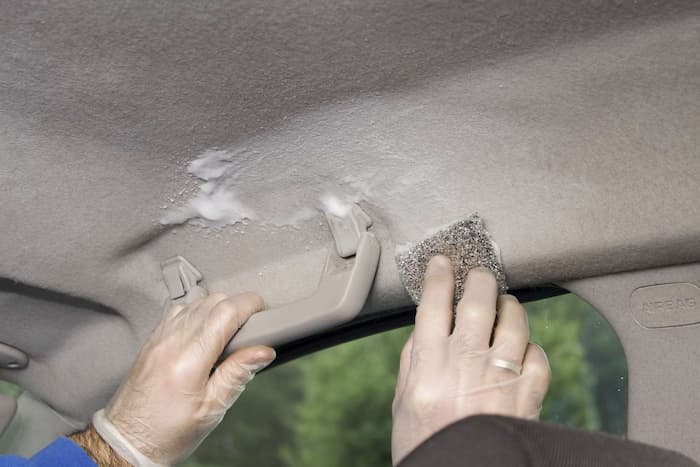
- Gently scrub the entire headliner with a brush with soft bristles. Work on each section of the headliner to ensure an even clean. If you don’t brush every little crevice, the stains might become visible once it dries.
- By using a microfiber towel to blot any moisture, allow the headliner to dry completely. Let it air dry after that. According to how wet it is, this might take an hour or two.
- Repeat steps one through four if the stains don’t come off. Hard stains might need to be cleaned again. However, you will need to deep clean your car’s headliner if the second surface cleaning is unsuccessful.
Deep Clean Your Car Headliner
You’ll have no choice but to thoroughly clean your headliner if surface cleaning doesn’t work. Deep cleaning procedures shouldn’t be used right away because, if not carried out properly, they risk damaging the glue holding your headliner in place.
- Follow the manufacturer’s instructions to heat up your steam cleaner. Now that the steam cleaner is hot, it’s time to work on the headliner. Check to see if the device needs to be cleaned with water or a cleaning solution.
- Steam your car’s headliner in sections once the steam has begun to fill the entire vehicle. To get rid of strong odors and stains, briefly hold the steamer over each component. Take this action quickly. The headliner’s glue melts more quickly as the steam permeates deeper. This will almost certainly cause the headlining to sag.
- Cleanse with a soft brush or microfiber cloth, then remove any loose dirt with a vacuum or duster.
- To avoid the adhesive failing and the growth of mold and mildew, let the deadliner dry completely. In order to hasten the drying process, you can open the windows and doors of your car and let the air circulate.
- After cleaning and drying a car’s headliner, you might see some traces on it. They are easily removed by running a clean hand over them, but only after the headliner has dried completely.
Just don’t do it if you don’t have the time or are unsure that you can do it at home. Drive over to a friendly neighborhood car wash near you and get your car deep cleaned by folks who know what they’re doing. Here are some answers to a few questions we assumed you might have before we bid you farewell and send you and your spotless car back out on the highway.
Why is It Essential to Clean a Car Headliner?
Even if you don’t think so, the headliner in your car serves purposes other than just aesthetic ones. By keeping cold or hot air inside, insulating the interior of your car with a headliner may improve the efficiency of your air conditioner or heater.
Foam supports today’s headliners. The interior of your car will be quieter and have less vibration when this foam insulation is used. “Quiet ride” is often a selling element for vehicles, but the headliner is a major factor.
With the addition of a headliner, your car’s appearance will be finished. Without one, your metal roof would be exposed, which is not at all appealing. Headliners have been a feature of automobiles for almost a century.
Leather and fabric upholstery are used in the construction of the headliners, and as with any item constructed from these materials, keeping them clean can increase their longevity. Unfortunately, headliners are frequently the area of your car that receives the least attention when it comes to cleaning.
Your headliner may gather dirt and odors.
How Are Headliners Made?
Most headliner material is composed of three layers. In order to improve insulation and reduce noise, a layer of foam will first be applied to the metal top of your car.
Next comes the backing material. This layer will be molded into the shape of the roof and is typically made of fiberglass or cardboard.
The material of this layer could be leather, vinyl, or fabric.
Vinyl and leather headliners are becoming less common. To clean it, use leather cleaning products and procedures intended exclusively for cleaning such materials if you’re lucky enough to have one.
To avoid damaging the fibers in your headliner, use a soft brush rather than a rough one. Even the most difficult stains can be eliminated with the right cleaner and a soft brush.
How to Clean Cigarette Smoke from a Car Headliner?
Using carpet or upholstery cleaner, spritz the smoke stain. Give it some time to work so that you can let it. Next, use a soft cloth to wipe or dab the headliner to remove any smoke stains.
How to Get Water Stains Out of a Headliner?
It is possible to have unsightly water stains if you accidentally leave your sunroof cracked open or if it is not closing properly. Simply dab the moisture away with a dry microfiber cloth if you catch it in time. Prior to attempting any stain removal, it is imperative to allow it to completely dry. Once you’ve done that, purchase some upholstery stain remover and proceed to step b of the aforementioned spot cleaning technique.
How Do You Get Grease Out of a Car Headliner?
Spraying your headliner with a carpet and interior cleaner that you can buy at the store is the simple solution. Spray a tiny amount of the solution onto a microfiber cloth’s corner. After that, gently dab until all grease is removed. Finally, gently wipe your headliner dry with the dry side of the microfiber cloth.
Summary
If you clean your car’s headliner, it will not only look great but will also allow you to breathe fresh air inside the vehicle without any additional odors. You should be able to get rid of any stains or odors you may have brought into your car using one of the methods we’ve listed.
It turns out that some stains on clothing are resistant to even the best over-the-counter cleaners and home remedies. At this point, it might be worthwhile to take your car to a professional car detailer.
After reading this, it is safe to say that cleaning a car’s headliner is doable—it just requires a few straightforward steps. Once you’ve washed it for the first time, you’ll see how simple it was to do.
However, I advise going to a nearby car wash or detailing shop if you’re still unsure or concerned about damaging your headliner. They will perform superbly for you. You should definitely try our methods first. Both your bank account and your car will be grateful to you!
I sincerely hope that I was able to give you some insightful information. Congratulations on your headline’s first cleaning!
Read about